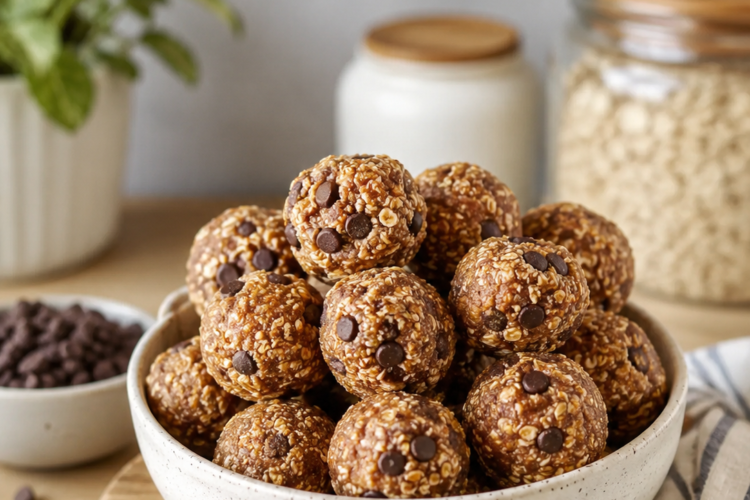
Chocolate Peanut Butter Protein Balls are a simple and satisfying no-bake snack made with wholesome ingredients such as natural peanut butter, oats, chocolate protein powder, maple syrup, and mini chocolate chips. These easy protein bites have a rich chocolate and peanut butter flavor while offering a convenient option for busy mornings, afternoon hunger, or post-workout recovery.
Because there is no baking involved, the recipe comes together with minimal preparation and is easy to make ahead for the week. If you are looking for healthy protein snacks that taste like a treat but can still fit into an active lifestyle, these homemade chocolate protein balls are a delicious choice.
The combination of chocolate and peanut butter gives these no-bake energy bites a familiar, dessert-like flavor. At the same time, the ingredients create a thick and satisfying texture that makes them easy to enjoy as a quick snack. The oats provide the base of the recipe, while peanut butter adds richness and helps hold the mixture together. Chocolate protein powder creates the main chocolate flavor and contributes protein, while maple syrup brings sweetness and softness to the mixture. Mini chocolate chips are optional, but they add small bursts of chocolate that make the finished protein balls even more enjoyable.
One of the biggest advantages of this chocolate peanut butter protein ball recipe is its convenience. You do not need an oven, complicated equipment, or a long list of ingredients. A food processor, a mixing bowl, and a few basic kitchen tools are enough to prepare the recipe. The oats are first processed into a coarse flour, which gives the protein bites a smooth but slightly hearty texture. Once the ingredients are combined, the mixture is rolled into small or large balls and chilled until firm. The result is an easy homemade snack that can be prepared in advance and stored for future use.
Why These Chocolate Protein Balls Are a Great Make-Ahead Snack
Make-ahead snacks can be extremely useful when you have a busy schedule. It is often easier to make healthier food choices when a satisfying snack is already prepared and ready to eat. These healthy peanut butter protein balls can be stored in the refrigerator or freezer, allowing you to prepare a batch and enjoy them over time. Instead of making a fresh snack every day, you can simply take a few protein bites from the container whenever you need something quick and filling.
These no-bake chocolate protein balls are also convenient because they can be portioned into different sizes. The original recipe can be rolled into 28 smaller protein bites or 14 larger balls. This makes it easy to choose a serving size based on your appetite and nutritional needs. Smaller balls work well as a light snack or sweet bite, while larger protein balls can be more suitable after a workout or when you need something more substantial between meals. Preparing the recipe in individual portions also makes storage and serving much easier.
The recipe is particularly useful for people who enjoy meal preparation but do not want to spend a lot of time in the kitchen. The total preparation and chilling time is only about 25 minutes, including approximately 10 minutes of active preparation. Once the balls are chilled, they can be transferred to an airtight container. Keeping a batch ready in the refrigerator means you have a softer and easier-to-bite snack available, while freezer storage creates a firmer texture and can be especially useful when preparing snacks to take with you.
The Chocolate and Peanut Butter Flavor Combination
Chocolate and peanut butter are one of the most popular flavor combinations for homemade protein snacks, energy bites, desserts, and other quick recipes. In these protein balls, the natural peanut butter provides a creamy and rich foundation that works well with the chocolate protein powder. The maple syrup adds sweetness and helps create a smooth, cookie-dough-like consistency. When the mini chocolate chips are stirred through the mixture, they add extra chocolate flavor without changing the basic preparation method.
The final chocolate flavor can vary depending on the protein powder you choose. Some chocolate protein powders have a strong cocoa taste, while others are sweeter or milder. This means the same recipe can have slightly different results when prepared with different products. Choosing a chocolate protein powder that you already enjoy is the easiest way to achieve the flavor you prefer. Since the recipe relies on protein powder for much of its chocolate character, the quality and flavor of the powder can make a noticeable difference in the finished protein balls.
If you want the finished protein bites to have a stronger chocolate flavor, the original recipe includes a simple adjustment. You can reduce the oats to 1½ cups and add ¼ cup of unsweetened cocoa powder. This creates a more intense chocolate taste while maintaining the same general style of recipe. The basic version, however, offers a balanced chocolate and peanut butter flavor that is rich without being overly complicated.
The Role of Natural Peanut Butter
Natural peanut butter is an important ingredient in these homemade protein balls because it contributes both flavor and texture. A simple natural peanut butter made with peanuts and salt works especially well. The peanut butter helps bind the ingredients together and gives the mixture a rich consistency. Smooth peanut butter can create a more uniform texture, while crunchy peanut butter adds small pieces of peanuts throughout the finished balls.
Warming the peanut butter briefly before mixing makes it easier to combine with the maple syrup and dry ingredients. The peanut butter should only be heated for a short time because excessive heating can affect its flavor. Once it has softened, it can be whisked with the maple syrup to create a smooth mixture. This step makes it easier to distribute the peanut butter evenly throughout the oat flour and protein powder.
The amount of peanut butter should remain as listed in the original recipe. Because it is one of the ingredients that helps create the correct consistency, changing the amount could affect how easily the mixture rolls into balls. If the mixture is properly combined, it should resemble thick cookie dough. It should feel sticky enough to hold together when pressed but should not be excessively wet.
Oats Create the Base of These Healthy Protein Bites
Rolled oats provide the main base for these chocolate peanut butter oatmeal balls. Before combining the ingredients, the oats are pulsed in a food processor until they become a coarse flour. This helps create a softer texture than using whole oats and allows the mixture to hold together more easily. Quick-cooking oats can also work because they can be processed into a similar consistency.
For anyone following a gluten-free diet, certified gluten-free oats should be used. This is important because regular oats can sometimes come into contact with gluten-containing grains during growing or processing. The recipe was designed around oats and does not require almond flour. Keeping the original oat-based structure also helps preserve the intended texture of these no-bake protein balls.
The oat flour combines with the chocolate protein powder to form the dry portion of the recipe. When the peanut butter mixture and oat milk are added, the dry ingredients absorb moisture and gradually form a thick dough. The oats also help balance the richness of the peanut butter and the sweetness of the maple syrup. Their mild flavor allows the chocolate and peanut butter to remain the most noticeable flavors in the finished snack.
Choosing the Right Chocolate Protein Powder
Chocolate protein powder plays two important roles in this recipe. It adds protein and provides a major part of the chocolate flavor. The original recipe uses 2 scoops, or 38 grams, of chocolate protein powder. However, different brands can have different levels of sweetness, cocoa flavor, and texture. For this reason, it is helpful to choose a protein powder that you already enjoy drinking or using in recipes.
Whey protein powder can be used for a dairy-based version of these protein balls. The original recipe specifically mentions Naked Whey Less Naked Chocolate, but the recipe can also be prepared with other chocolate protein powders. When selecting an alternative, consider the amount of added sugar and the flavor profile. A protein powder with a very sweet flavor may produce sweeter protein balls, while a milder chocolate powder can create a more balanced result.
Plant-based chocolate protein powder can also be used to make a vegan version. Options mentioned in the original recipe include Owyn, Aloha, and Sun Warrior. The exact texture may vary between brands because plant-based powders can absorb moisture differently from whey protein. If necessary, the oat milk can be adjusted gradually according to the original instructions until the mixture reaches a thick, rollable consistency.
How to Make Chocolate Peanut Butter Protein Balls
The preparation begins by briefly softening the natural peanut butter in a microwave-safe bowl. Once it is easy to stir, the maple syrup is whisked into the warm peanut butter. This creates a smooth and sweet mixture that can be added to the dry ingredients. Meanwhile, the rolled oats are processed into a coarse flour and placed in a large mixing bowl with the chocolate protein powder and salt.
After the dry ingredients are combined, the peanut butter and maple syrup mixture is added along with the vanilla extract and 3 tablespoons of unsweetened oat milk. The ingredients should be stirred thoroughly until they begin to form a thick dough. If dry spots remain, more oat milk should be added gradually, using only ½ tablespoon at a time. This small adjustment method is important because the amount of liquid needed can depend on the protein powder and the natural thickness of the peanut butter.
Once the mixture reaches a cookie-dough-like consistency, the mini chocolate chips are stirred in. The dough can then be divided using a tablespoon and rolled into individual balls. You can prepare 28 small protein balls or 14 larger ones. After shaping, place the balls in a baking dish or on a suitable baking sheet. Cover and freeze for 15 to 20 minutes, or until they have become slightly firm.
Notes for Achieving the Best Texture
The correct texture is one of the most important details when making homemade protein balls. The mixture should not be crumbly and dry, but it should not be loose or runny either. A thick, sticky, cookie-dough-like texture makes the balls easiest to shape. If the mixture does not hold together, adding oat milk in small increments can help. It is better to add the milk gradually than to add too much at once.
Different protein powders can absorb liquid differently, which is why the recipe includes a range of 3 to 4 tablespoons of oat milk. Begin with the lower amount and only add more if needed. The same approach can help maintain the original consistency even when using a different brand of protein powder. Stir the mixture thoroughly after every addition so you can accurately judge the texture.
If the mixture becomes too soft to roll comfortably, chilling it briefly can help. However, the original recipe is designed to be rolled immediately after mixing when the ingredients are properly balanced. Taking time to mix the ingredients thoroughly before adjusting the liquid is often enough to create the correct consistency. The oats and protein powder need a short time to absorb moisture, so avoid making unnecessary adjustments too quickly.
Refrigerator and Freezer Storage
These chocolate peanut butter protein balls can be stored for extended periods, making them useful for meal preparation. According to the original recipe, they can be kept in the refrigerator for up to 2 weeks. Refrigerated protein balls have a softer texture and are ready to eat directly from the container. This option works well if you prefer a softer snack or expect to finish the batch relatively quickly.
For longer storage, the protein balls can be frozen for up to 4 months. They are generally considered best within the first month of freezing for optimal flavor and texture. Freezer storage creates a firmer consistency, which many people enjoy. The firmer texture can also make the balls more practical when they are taken away from home because they remain solid for longer as they warm.
An airtight container is recommended for both refrigerator and freezer storage. Proper storage helps protect the flavor and prevents the protein balls from absorbing unwanted freezer odors. If you are preparing several batches for meal prep, individual portions can make serving easier. The balls can simply be removed as needed instead of thawing or handling an entire batch.
Making a Vegan Version
The basic recipe can be adapted for a vegan diet without changing the main preparation method. The original instructions recommend using a plant-based chocolate protein powder instead of whey protein powder. The mini chocolate chips should also be vegan if you want the recipe to remain completely dairy-free. Once those two ingredient choices are made, the remaining preparation process stays the same.
The texture of plant-based protein powders can vary significantly. Some may create a thicker dough, while others may require a little more liquid. Follow the original instruction of starting with 3 tablespoons of oat milk and increasing the amount only if dry spots remain. Adding the liquid slowly makes it easier to maintain the thick, sticky texture needed for shaping the protein balls.
A vegan version can still provide the same chocolate and peanut butter flavor profile while offering a convenient plant-based snack. The oats, maple syrup, natural peanut butter, vanilla extract, salt, and oat milk already work well in a vegan recipe. The main consideration is choosing a suitable plant-based protein powder and vegan chocolate chips.
A Nut-Free Variation
For a nut-free version, sunflower butter can be used in place of peanut butter. The original instructions note that this change will alter the flavor, making the finished protein balls more chocolate-forward. The overall method remains similar because sunflower butter can provide the creamy texture needed to bind the ingredients together.
Tahini may also be considered as another alternative, although its flavor will be noticeably different from peanut butter and was not specifically tested in the original preparation. If making a nut-free version, it is important to choose an alternative spread that works with your own dietary requirements. As with the original version, the mixture should be adjusted carefully with the oat milk until it forms a thick dough.
The nut-free version will not have exactly the same classic chocolate peanut butter taste, but it can still be a convenient homemade protein snack. The main chocolate flavor comes from the protein powder, while the chocolate chips add additional sweetness and texture. A suitable seed-based spread can therefore provide a practical alternative while maintaining the easy no-bake format.

No-Bake High Protein Chocolate Peanut Butter Balls
These No-Bake Chocolate Peanut Butter Protein Balls are rich, chewy, and easy to prepare.
14
servings10
minutes140
kcal15
minutes25
minutesIngredients
½ cup natural peanut butter
⅓ cup pure maple syrup
1 ¾ cups oats, pulsed into a flour*
2 scoops (38 gram) chocolate protein powder
⅛ teaspoon salt
1 teaspoon vanilla extract
3–4 tablespoons unsweetened oat milk
2–3 tablespoons mini chocolate chips
Directions
- Place the natural peanut butter in a small microwave-safe bowl. Microwave for approximately 15 seconds, just until softened. Whisk in the pure maple syrup until smooth, then set the mixture aside.
- Add the rolled oats to a food processor and pulse until they become a coarse flour. Transfer the oat flour to a large mixing bowl.
- Add the chocolate protein powder and salt to the bowl with the oat flour. Stir the dry ingredients until evenly combined.
- Pour the peanut butter and maple syrup mixture into the dry ingredients. Add the vanilla extract and 3 tablespoons of unsweetened oat milk.
- Stir thoroughly until the mixture forms a thick, sticky consistency similar to cookie dough. If dry areas remain, add additional oat milk ½ tablespoon at a time until the mixture reaches the desired consistency.
- Fold in the mini chocolate chips until they are evenly distributed throughout the protein ball mixture.
- Use a tablespoon to divide and roll the mixture into 28 small balls or 14 larger balls. Arrange them in a 9-inch by 13-inch baking dish or on a suitable tray.
- Cover the dish and freeze the chocolate peanut butter protein balls for 15 to 20 minutes, or until slightly hardened.
- Transfer the chilled protein balls to an airtight container. Store them in the refrigerator for up to 2 weeks or in the freezer for up to 4 months.
Notes
- Storage and Texture
Store the protein balls in an airtight container. Keep them in the refrigerator if you prefer a softer texture. Store them in the freezer if you prefer a firmer texture or want them to remain more solid when taken on the go. - Making Them More Chocolatey
For a stronger chocolate flavor, reduce the oats from 1¾ cups to 1½ cups and add ¼ cup unsweetened cocoa powder. - Vegan Option
Use a plant-based chocolate protein powder and vegan mini chocolate chips. - Nut-Free Option
Sunflower butter can be used as an alternative to peanut butter. The flavor will be different and may create a more chocolate-forward result.
Nutrition Facts
- Calories: 140kcal
- Fat: 6g
- Carbohydrates: 16g
- Fiber: 2g
- Sugar: 8g
- Protein: 6g
