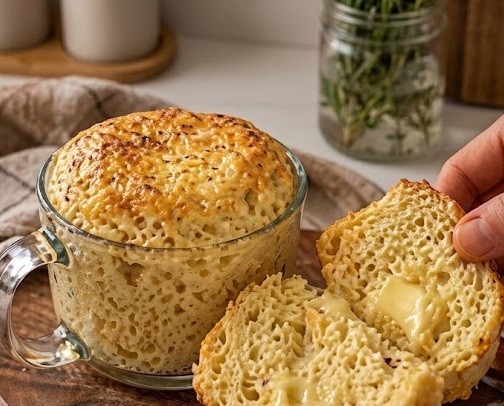
When you need fresh bread quickly but do not want to make an entire loaf, this 90 second microwave mug bread is an excellent option. This simple keto mug bread recipe uses a handful of basic ingredients and cooks in the microwave in about one to one and a half minutes.
The finished bread is soft, sturdy enough for sandwiches, and especially good after a quick turn in the toaster. It is a convenient choice for breakfast, lunch, snacks, or whenever you want a small serving of homemade low carb bread without heating the oven.
What Makes This Microwave Mug Bread So Useful?
A Quick Single-Serving Bread
Traditional bread recipes usually require mixing, kneading, rising, shaping, and baking, which can take several hours from start to finish. This microwave bread takes a completely different approach. Everything is mixed directly in a small ramekin or microwave-safe container, and the batter cooks rapidly. Because the recipe makes one serving, there is no need to prepare a full loaf when you only need a couple of slices for a meal or snack.
Soft Inside and Better When Toasted
The texture of microwave bread is naturally different from conventional yeast bread, but that does not mean it cannot be satisfying. This 90 second keto bread has a soft, compact texture that sits somewhere between sandwich bread and an English muffin. The biggest improvement comes from toasting it after cooking. Toasting adds crisp golden edges, improves the texture, and gives the bread a more familiar toasted-bread character that works particularly well with savory toppings.
Ingredients Needed for 90 Second Keto Bread
Almond Flour Version
The main version of this recipe uses almond flour, which provides a pleasant flavor and a soft but sturdy texture. You will need almond flour, avocado oil or melted butter or coconut oil, baking powder, one large egg, and a tiny pinch of kosher salt. These ingredients are combined directly in the cooking container, making the recipe particularly convenient when you want minimal preparation and very little cleanup afterward.
Coconut Flour Version
Coconut flour can also be used as an alternative to almond flour. The important difference is that coconut flour absorbs considerably more liquid, so the quantity used is much smaller. The original recipe uses 1 ⅓ tablespoons coconut flour in place of the almond flour. The remaining ingredients stay the same, including the oil or melted butter, baking powder, egg, and tiny pinch of kosher salt.
How to Make Microwave Mug Bread
Prepare the Ramekin
Start by choosing a small microwave-safe ramekin or container. A 4-inch ramekin is particularly useful because it creates a bread round with enough height to cut horizontally after cooking. Add the avocado oil, melted butter, or coconut oil to the container and swirl it around so the bottom and sides are lightly coated. This helps reduce sticking and makes the finished bread easier to remove.
Mix the Ingredients
Add the almond flour or coconut flour, baking powder, egg, and kosher salt to the coated ramekin. Use a fork to stir everything together until the mixture is evenly combined. At first, the batter may appear relatively thin, but this is normal. Take a moment to mix thoroughly so there are no obvious dry pockets of flour. Gently tapping the container against the counter a few times can also help release larger air bubbles.
Microwave Until Set
Place the container in the microwave and cook on high for approximately 60 to 90 seconds. Microwave strength can vary, so the exact cooking time may differ slightly between appliances. The bread is ready when the surface looks set and the center is cooked through. Avoid automatically adding extra cooking time because overcooking can quickly change the soft texture into something dry or rubbery.
Cool and Slice
Once the bread has finished cooking, allow it to sit for approximately one or two minutes. This short resting period gives the crumb time to settle and makes the bread easier to handle. Carefully remove it from the ramekin, then slice it horizontally into two pieces. The slices can be eaten immediately, but toasting them will give you a considerably better texture.
Why Toasting Makes Such a Difference
Create Crisp Golden Edges
Toasting is one of the most important steps if you want your microwave mug bread to resemble conventional toast more closely. The exterior becomes lightly crisp and golden while the inside remains pleasantly tender. This contrast makes the bread much more enjoyable for sandwiches, grilled cheese, breakfast combinations, burgers, and simple buttered toast. Even a short time in a toaster or under a suitable heating element can noticeably improve the finished texture.
Improve the Overall Flavor
Freshly microwaved mug bread can have a noticeable egg flavor because the recipe relies on an egg for structure. Toasting helps develop a more pleasant roasted flavor and reduces some of the soft, steamed quality associated with microwave cooking. If you prefer a more neutral flavor, using only the egg white can also help. The egg yolk is responsible for much of the characteristic eggy taste.
How to Avoid Rubbery Microwave Bread
Do Not Overcook It
The most common reason microwave mug bread becomes rubbery is excessive cooking. Because microwaves work quickly, even an additional short period can make a difference. Begin with the recommended 60 to 90 seconds and check the bread as it approaches the end of the cooking time. You are looking for a set top and a cooked center rather than a heavily dried surface.
Use the Right Container
The size and shape of the ramekin can influence the finished bread. A 4-inch ramekin or microwave-safe container works well because it creates enough height for the bread to be sliced into two sandwich-style pieces. A container that is significantly wider may produce a thinner bread, while a very small container can make the mixture thicker and affect the cooking time.
Allow the Bread to Rest
Removing the bread and slicing it immediately can make it seem softer or less stable than expected. Giving it a minute or two to cool allows the structure to settle. This small step is especially helpful when you want clean slices for sandwiches or toast. Once it has rested, slicing becomes easier and the bread is less likely to break apart.
How to Make the Bread Less Eggy
Use an Egg White
If you enjoy the convenience of this recipe but do not like a noticeable egg flavor, use only the egg white instead of the whole egg. The yolk contributes much of the eggy taste, so removing it creates a lighter and more neutral flavor. This adjustment can also make the finished bread feel somewhat lighter, although the original whole-egg version remains the standard ingredient combination provided in the recipe.
Ways to Serve 90 Second Keto Bread
Breakfast Sandwiches and Toast
This quick bread is particularly useful at breakfast. After slicing and toasting, you can use it as the base for a breakfast sandwich or simply spread it with butter. It can also be served with other breakfast ingredients when you want something more substantial than a snack but do not want to prepare a full loaf of bread.
Grilled Cheese
One of the best applications for microwave mug bread is grilled cheese. Toasting the bread first gives the outside enough firmness to handle melted cheese while maintaining a softer center. The compact shape also makes it convenient when preparing a single-serving grilled cheese without needing several slices of a standard loaf.
Burgers and Pulled Pork Sandwiches
The sturdy texture makes this low carb microwave bread useful for burgers and other hearty fillings. It can also be paired with pulled pork and coleslaw. Toasting before adding the filling helps the bread hold its shape and prevents it from feeling overly soft once sauces or moist ingredients are added.
Avocado Toast and Simple Snacks
For a quick snack, slice and toast the bread, then add butter or your preferred topping. It can also serve as the base for avocado toast. A simple toasted slice is often all you need when you want something fast and filling without making an entire batch of bread.
Can This Bread Be Made Sweet?
A Simple Sweet Variation
The basic recipe is neutral enough to work with either savory or mildly sweet toppings. For a sweeter version, the original recipe suggests adding a little cinnamon and sweetener to the batter before cooking. Afterward, the toasted bread can be served with an appropriate topping. This makes the same basic microwave method more flexible for breakfast or snack combinations.
Can You Bake This Mug Bread in the Oven?
Oven-Baking Method
Although the main recipe is designed for the microwave, it can also be baked in an oven-safe container. The provided method is to bake it at 375°F for about 10 minutes, or until the center is set. Oven cooking takes longer than microwaving, but it can be useful if you prefer conventional baking or are already using the oven for another dish.
Almond Flour vs. Coconut Flour
Choosing Almond Flour
Almond flour is the preferred choice in the original recipe because it provides the flavor and texture the recipe is designed around. It also produces a bread that works well when toasted and used for sandwiches. If you already keep almond flour in your pantry, it is the straightforward option for making this quick keto bread.
Choosing Coconut Flour
Coconut flour is useful when you prefer that ingredient or need an alternative to almond flour. Because it absorbs more liquid, you should not substitute it in an equal amount. The recipe specifically uses 1 ⅓ tablespoons coconut flour instead of the 3 tablespoons almond flour. Keeping the quantities correct is important for maintaining the intended consistency.
How to Store Microwave Mug Bread
Refrigerator Storage
This bread is best when freshly made and toasted, but leftovers can be stored. Allow the bread to cool before wrapping it tightly or placing it in an airtight container. Keep it refrigerated for up to 3 days. When ready to eat, slice it if necessary and toast it before serving. Toasting restores some of the texture that makes this recipe most enjoyable.
Freezer Storage
For longer storage, the bread can be frozen for up to 2 months. Let it cool completely before wrapping it tightly and placing it in the freezer. You can thaw it in the refrigerator, or toast it directly from frozen when convenient. As with refrigerated leftovers, reheating and toasting can make the bread much more pleasant to eat.
Notes for the Best Results
Important Recipe Notes
The most important detail is to watch the cooking time carefully. Microwave ovens vary, so the bread may finish closer to 60 seconds in one appliance and require closer to 90 seconds in another. Stop cooking once the top is set rather than continuing simply to make the bread firmer. Excessive microwave cooking is the quickest way to create a dry or rubbery texture.
A 4-inch ramekin is a practical choice because it gives the bread enough height to slice into two pieces. Remember that the container must be microwave-safe if you are using the microwave method. Allowing the bread to cool briefly before slicing also helps it hold together more effectively.
Toasting is strongly recommended when texture matters. The freshly microwaved bread is soft, but toasted bread becomes firmer on the outside and more suitable for sandwiches, grilled cheese, burgers, and toast. For a less eggy flavor, use only the egg white. Almond flour provides the preferred flavor and texture, while coconut flour can be used in the specified smaller quantity.
Frequently Asked Questions About Microwave Mug Bread
Why Does My 90 Second Bread Taste Eggy?
The egg yolk is largely responsible for the eggy flavor that some people notice in microwave mug bread. If you prefer a more neutral taste, use only the egg white. Toasting the finished bread can also improve its overall flavor and make it taste more like conventional toasted bread.
Why Is My Microwave Bread Rubbery?
Rubbery bread is usually the result of overcooking. Microwave cooking happens quickly, so even a little extra time can dry out the structure. Cook the bread for approximately 60 to 90 seconds and check that the top is set. Letting it rest briefly and then toasting it can further improve the texture.
Can I Make This Recipe With Coconut Flour?
Yes. Coconut flour can be used instead of almond flour, but the quantity must remain different because coconut flour absorbs considerably more liquid. The specified alternative is 1 ⅓ tablespoons coconut flour in place of 3 tablespoons almond flour.
Can I Make Mug Bread in the Oven?
Yes. If you prefer to use an oven, place the mixture in an oven-safe container and bake at 375°F for approximately 10 minutes, or until the center is set. The microwave remains the quickest method, but oven baking provides another way to prepare the recipe.
What Is the Best Container for Mug Bread?
A 4-inch ramekin or another small microwave-safe container is recommended. This size gives the cooked bread enough height to slice horizontally into two pieces. You can technically use a mug or another suitable container, but always make sure it is designed for microwave use and appropriate for the cooking method.
Can 90 Second Bread Be Frozen?
Yes. Allow the bread to cool completely, wrap it tightly, and freeze it for up to two months. Thaw it in the refrigerator or toast it from frozen. Toasting after storage is recommended because it helps restore a firmer, more enjoyable texture.
What Exactly Is Mug Bread?
Mug bread is a small-batch bread made directly in a mug, ramekin, or other suitable container. Unlike traditional bread, it does not require yeast, kneading, or a long rise. This particular 90 second mug bread recipe uses a microwave to cook a single serving rapidly, making it convenient for sandwiches, toast, burgers, and quick snacks.
Why This Recipe Works for Quick Low Carb Meals
Convenient Single-Serving Preparation
A major advantage of this recipe is that it produces a single serving rather than an entire loaf. That makes it practical for anyone who wants a quick bread option without having several days’ worth of bread sitting in the kitchen. The ingredients are combined in one container, cooked quickly, and ready to toast shortly afterward.
Minimal Cleanup
Because the ingredients can be mixed directly in the ramekin or microwave-safe container, cleanup is also simple. There is no mixing bowl, loaf pan, dough hook, or baking tray required for the microwave method. For a fast breakfast or lunch, reducing the number of dishes can be just as useful as reducing the cooking time.
Microwave Mug Bread Recipe
This 90 second keto mug bread is a quick single-serving bread made in the microwave with simple ingredients.
1
servings2
minutes1
minute235
kcal3
minutesIngredients
3 tablespoons almond flour (or 1 ⅓ tablespoons coconut flour)
1 tablespoon avocado oil, melted butter, or coconut oil
½ teaspoon baking powder
1 large egg
Tiny pinch of kosher salt
Directions
- Add the avocado oil, melted butter, or coconut oil to a 4-inch ramekin or microwave-safe container.
- Swirl the oil around the bottom and sides to help prevent the bread from sticking.
- Add the almond flour or coconut flour, baking powder, egg, and kosher salt.
- Stir thoroughly with a fork until the ingredients are evenly combined.
- Tap the ramekin gently on the counter a few times to release larger air bubbles.
- Microwave on high for 60–90 seconds, or until the top looks set and the center is cooked.
- Let the bread cool for 1–2 minutes before carefully removing it from the container.
- Slice the bread horizontally into two pieces.
- Toast the slices before serving for the best texture.
- For a less eggy flavor, use only the egg white instead of the whole egg.
- Oven-Baking Alternative
- Place the mixture in an oven-safe container and bake at 375°F for about 10 minutes, or until the center is set.
Notes
- Toasting gives this microwave bread its best texture and makes it more suitable for sandwiches and toast.
- Avoid overcooking, as excessive microwave time can make the bread rubbery.
- A 4-inch ramekin or microwave-safe container provides a good shape and height for slicing.
- Almond flour gives the preferred flavor and texture, while coconut flour can be used in the specified smaller quantity.
- For a less eggy taste, replace the whole egg with only the egg white.
- Allow the bread to cool for a minute or two before slicing.
Nutrition Facts
- Calories: 235kcal
- Fat: 20g
- Carbohydrates: 5.7g
- Fiber: 3g
- Protein: 8g
