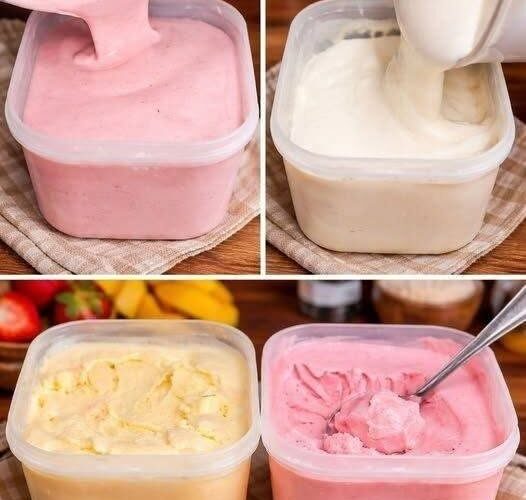
There is nothing quite like a scoop of homemade ice cream. It is cold, creamy, sweet, and incredibly satisfying, especially on a warm afternoon or after a family meal. While traditional ice cream recipes can require an ice cream machine, eggs, cooking, and several complicated steps, this no-churn ice cream recipe takes a much simpler approach.
With only a few basic ingredients, you can prepare a smooth and creamy frozen dessert without purchasing special equipment. The recipe uses whipped heavy cream and sweetened condensed milk to create a rich base with a soft, scoopable texture. Vanilla adds a classic aroma, while a tiny amount of salt balances the sweetness.
The best part is that this recipe can become the foundation for countless flavors. Once you learn the basic method, you can make chocolate, mango, strawberry, coffee, cookies and cream, pistachio, caramel, or even a South Asian-inspired kulfi version.
Why Make No-Churn Ice Cream?
There are several advantages to making ice cream at home.
- No ice cream machine is required.
- The preparation is simple and beginner-friendly.
- Only a few ingredients are needed.
- The recipe can be customized with different flavors.
- It makes an excellent dessert for parties and family gatherings.
- You can control the ingredients and toppings.
- It can be prepared ahead of time.
- Children can help with many of the simple preparation steps.
This recipe is especially useful when you want a homemade dessert but do not want to spend hours in the kitchen.
What Makes No-Churn Ice Cream Creamy?
The texture comes from the combination of whipped cream and sweetened condensed milk.
When heavy cream is whipped, air becomes incorporated into the cream. This gives the ice cream a light and fluffy structure. The sweetened condensed milk contributes sweetness while also providing a thick, smooth consistency.
Because the mixture contains relatively little free water compared with many simpler frozen desserts, it can freeze into a creamy texture rather than becoming extremely hard and icy.
The technique is important, though. The cream should be whipped properly, and the ingredients should be folded together gently. Overmixing can remove some of the air that gives the finished ice cream its pleasant texture.
Ingredients
For approximately 8 servings, gather the following ingredients:
- 2 cups cold heavy cream
- 1 can sweetened condensed milk, approximately 14 ounces or 397–400 grams
- 1 teaspoon pure vanilla extract
- A small pinch of salt
Optional Ingredients
You can also prepare additional ingredients for flavor variations:
- 2 tablespoons cocoa powder
- ½ cup mango puree
- ½ cup strawberry puree
- ½ cup crushed chocolate cookies
- 1 teaspoon instant coffee dissolved in a teaspoon of warm water
- ¼ cup chopped pistachios
- ¼ teaspoon ground cardamom
- A few saffron strands
- Chocolate chips
- Caramel sauce
- Chopped almonds or other nuts
You do not need to use all of these ingredients. Choose one flavor combination or create your own.
Equipment Needed
One reason this recipe is so convenient is that you do not need specialized equipment.
You will need:
- A large mixing bowl
- An electric hand mixer or stand mixer
- A second bowl for combining ingredients
- A rubber spatula
- A freezer-safe container
- Measuring cups and spoons
A metal or glass mixing bowl that has been chilled beforehand can make whipping the cream easier.
How to Make No-Churn Vanilla Ice Cream
1. Chill the Ingredients
Before starting, make sure the heavy cream is thoroughly chilled.
Cold cream whips much more effectively than warm cream. If possible, place the mixing bowl and beaters in the refrigerator or freezer for a short time before preparing the recipe.
Do not freeze the cream itself. It should remain liquid but very cold.
2. Whip the Heavy Cream
Pour the cold heavy cream into a large bowl.
Using an electric mixer, begin beating at a moderate speed. Gradually increase the speed as the cream thickens.
Continue whipping until stiff peaks form.
When you lift the beaters, the cream should hold its shape rather than immediately falling back into the bowl.
Be careful not to continue whipping for too long. Overwhipping can make the cream grainy and eventually turn it toward a butter-like consistency.
3. Prepare the Condensed Milk Mixture
Place the sweetened condensed milk in a separate bowl.
Add the vanilla extract and a small pinch of salt.
Stir gently until everything is evenly combined.
The vanilla provides the primary flavor, while the salt helps prevent the dessert from tasting excessively sweet.
4. Combine the Mixtures
Add approximately one-third of the whipped cream to the condensed milk mixture.
Fold gently with a rubber spatula.
Once incorporated, add another portion of whipped cream and continue folding.
Finally, add the remaining whipped cream.
Do not vigorously stir the mixture. Gentle folding helps preserve the air that was incorporated into the cream.
The finished mixture should look smooth, thick, and fluffy.
5. Add Your Favorite Flavor
If you want classic vanilla ice cream, you can move directly to the freezing step.
For a different flavor, gently fold in your selected ingredients.
For example, you could add crushed cookies for cookies-and-cream ice cream or mango puree for a fruity variation.
If using a liquid flavoring or fruit puree, avoid adding excessive amounts because too much liquid can affect the final texture.
6. Transfer to a Container
Spoon the mixture into a clean freezer-safe container.
A shallow container can make the ice cream freeze somewhat more evenly and can make scooping easier later.
Smooth the surface with a spatula.
If you want a decorative appearance, drizzle caramel or chocolate sauce over the surface and use a spoon to create simple swirls.
7. Cover the Ice Cream
Cover the container tightly with a lid.
If your container does not have a good lid, cover the surface carefully with plastic wrap before placing the container in the freezer.
Keeping the ice cream covered helps protect it from freezer odors and reduces the chance of ice crystals forming on the surface.
8. Freeze Until Firm
Place the container in the freezer.
Allow the ice cream to freeze for approximately 6–8 hours, or preferably overnight.
Freezer temperatures vary, so the exact time can differ.
The ice cream should be firm throughout before serving.
9. Let It Soften Before Serving
Homemade ice cream can become quite firm when frozen for an extended period.
Take the container out of the freezer and let it sit at room temperature for approximately 5–10 minutes.
This short resting period makes scooping easier and gives the ice cream a smoother eating texture.
10. Scoop and Serve
Use a sturdy ice cream scoop to portion the dessert into bowls or cones.
Serve immediately with your favorite toppings.
Chocolate No-Churn Ice Cream
Chocolate is one of the easiest variations.
To make it, add approximately 2 tablespoons of unsweetened cocoa powder to the condensed milk mixture before folding in the whipped cream.
For a richer chocolate dessert, add a small amount of melted and cooled chocolate.
You can also fold in chocolate chips or chopped chocolate for extra texture.
Mango No-Churn Ice Cream
Mango creates a naturally sweet and refreshing frozen dessert.
Use approximately ½ cup of thick mango puree.
Choose ripe, flavorful mangoes and remove as much excess liquid as possible. Fold the puree gently into the prepared ice cream base.
For a South Asian-inspired flavor, ripe seasonal mangoes can provide a particularly fragrant result.
Strawberry Ice Cream
For strawberry ice cream, finely chop fresh strawberries or prepare a thick strawberry puree.
Fold approximately ½ cup into the base.
You can reserve a few small pieces of strawberry to add additional texture.
Because fresh fruit contains water, avoid using an excessive amount of puree.
Cookies and Cream
Crush your favorite chocolate sandwich cookies into small pieces.
Fold them into the vanilla mixture before freezing.
For extra cookie flavor, sprinkle additional crushed cookies over the top.
This version is particularly appealing for children and makes a fun birthday-party dessert.
Coffee Ice Cream
Coffee adds a pleasant roasted flavor that balances the sweetness of condensed milk.
Dissolve approximately 1 teaspoon of instant coffee in a very small amount of warm water.
Allow it to cool before adding it to the condensed milk mixture.
For stronger coffee flavor, adjust the amount gradually according to your preference.
Pistachio Kulfi-Inspired Ice Cream
For a dessert inspired by traditional South Asian flavors, combine pistachios with cardamom and saffron.
Add:
- ¼ cup finely chopped pistachios
- A small pinch of cardamom
- A few saffron strands
You can also add a small amount of rose water if desired.
This creates a fragrant frozen dessert with a flavor profile reminiscent of kulfi while retaining the simple no-churn preparation method.
Helpful Tips for Perfect Results
Use Full-Fat Ingredients
Full-fat heavy cream generally produces a richer and creamier result.
Keep the Cream Cold
Cold cream is much easier to whip and holds its structure better.
Do Not Overwhip
Stop whipping as soon as stiff peaks form.
Fold Carefully
Gentle folding keeps the mixture light and airy.
Use Thick Fruit Purees
Very watery fruit mixtures can increase ice formation.
Keep the Container Covered
Proper covering helps maintain quality during freezing.
Give the Ice Cream Time to Soften
A few minutes outside the freezer can make scooping significantly easier.
Common Mistakes
The Cream Does Not Whip
The cream may not be cold enough, or it may not contain enough fat. Chill the cream and bowl before trying again.
The Ice Cream Is Too Hard
Homemade ice cream can become firm in a cold freezer. Allow it to sit at room temperature for several minutes before scooping.
The Ice Cream Is Icy
Excess liquid from fruit, poor storage, or repeated thawing and refreezing can contribute to an icy texture.
The Dessert Is Too Sweet
Sweetened condensed milk is naturally very sweet. Avoid adding additional sugar unless you have adjusted the recipe carefully.
The Ice Cream Is Dense
Overmixing after adding the whipped cream can remove the incorporated air. Fold the ingredients gently.
Storage Instructions
Keep homemade ice cream in a tightly sealed freezer-safe container.
For the best flavor and texture, enjoy it within approximately 1–2 weeks. It may remain safe for longer when continuously frozen, but quality can gradually decline.
Avoid repeatedly allowing the entire container to melt and then refreezing it. Instead, remove only the amount you plan to serve.
Serving Ideas
This ice cream can be served in many delicious ways.
Try it with:
- Chocolate syrup
- Caramel sauce
- Chopped pistachios
- Toasted almonds
- Fresh strawberries
- Sliced bananas
- Crushed cookies
- Chocolate chips
- Whipped cream
- Fresh mango
- Waffle cones
- Brownies or cake
You can also use a scoop of homemade ice cream to make milkshakes, sundaes, ice cream sandwiches, or dessert parfaits.
Frequently Asked Questions
Can I Make No-Churn Ice Cream Without an Ice Cream Maker?
Yes. That is the main advantage of this recipe. Whipped cream provides the aeration that a traditional churning process normally helps create.
Can I Use Whipping Cream?
Yes, provided it has an appropriate fat content for whipping. Chilled heavy cream generally produces a rich and stable result.
How Long Does It Take to Freeze?
Most batches require approximately 6–8 hours, although freezing time depends on the container, freezer temperature, and quantity.
Can I Make This Recipe Eggless?
Yes. The basic recipe does not require eggs.
Can I Add Fresh Fruit?
Yes. Thick fruit purees or small pieces of fruit can be incorporated. Avoid adding excessive watery fruit because it can affect texture.
