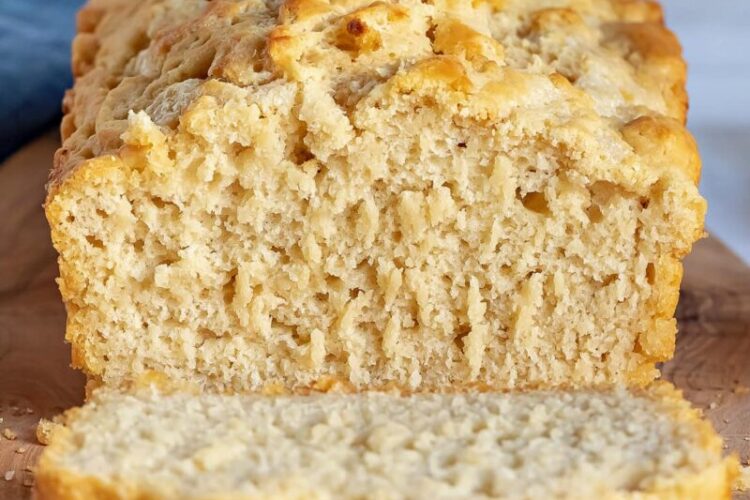
After years of testing and refining gluten-free sourdough, this recipe stands out as the most reliable and rewarding. It produces a large, bakery-style loaf with a beautifully soft crust and airy, fluffy crumb—something that’s often difficult to achieve without gluten.
Unlike traditional gluten-free breads that can feel dense or dry, this version uses a combination of eggs, milk, and natural fermentation to create structure, moisture, and elasticity. The result is a loaf that slices cleanly, feels soft to the touch, and tastes rich with a mild tang.
Best of all, this is a same-day sourdough recipe, requiring only one fermentation stage while still delivering excellent flavor and texture.
Understanding Gluten-Free Sourdough
Gluten-free sourdough is naturally leavened using a wild yeast starter, instead of commercial yeast. Because gluten-free flours lack elasticity, this recipe relies on ingredients like psyllium husk and xanthan gum to mimic the structure that gluten would normally provide.
The addition of eggs and milk further strengthens the dough, giving the bread a soft, enriched texture while helping it hold its shape during baking.
Key Ingredients & Their Role
- Gluten-Free Starter: The heart of the recipe—must be active, bubbly, and recently fed for proper rise
- Sorghum Flour: Adds body, mild flavor, and nutritional value
- Tapioca Starch: Provides chewiness and flexibility
- Potato Starch: Lightens the crumb and prevents heaviness
- Psyllium Husk: Essential for binding, moisture retention, and structure
- Xanthan Gum: Enhances elasticity and softness
- Eggs & Milk: Create richness, softness, and stability
- Oil: Improves texture and keeps the crumb tender
- Baking Powder: Boosts oven spring for a better rise
Ingredients
Psyllium Gel
- 20g psyllium husk (or 18g powder)
- 260g water (room temperature)
Dry Ingredients
- 130g tapioca starch
- 100g potato starch
- 170g sorghum flour (or brown rice/millet/oat flour)
- 15g sugar (optional but helpful for fermentation)
- 7g xanthan gum
- 8g baking powder
- 12g salt
Wet Ingredients
- 120g milk (or dairy-free alternative)
- 2 eggs (room temperature)
- 50g neutral oil
- 60g active gluten-free sourdough starter
Step-by-Step Instructions
1. Activate the Psyllium
In a medium bowl, whisk psyllium husk with water. Within 1–2 minutes, it will form a thick gel. This step is crucial, as it replaces gluten’s binding ability.
2. Combine Dry Ingredients
In a large mixing bowl, thoroughly whisk together all dry ingredients. This ensures even distribution and prevents clumping, especially for xanthan gum and baking powder.
3. Mix the Dough
Add the psyllium gel along with all wet ingredients into the dry mixture.
Use an electric mixer with dough hooks and mix for at least 5 minutes until the dough becomes smooth and cohesive.
The dough will be very sticky and thick—this is completely normal. Avoid adding extra flour, as it will make the bread dense.
4. Shape the Dough
Lightly flour your work surface and transfer the dough. Shape it gently into a round (boule) or oval (batard).
Use oiled hands or a dough scraper to prevent sticking. Unlike wheat dough, there is no need for kneading or stretch-and-fold techniques.
5. Proofing (Fermentation)
Place the shaped dough into a floured banneton basket or a bowl lined with a kitchen towel.
Cover and let it proof:
- 5–7 hours at room temperature (around 24°C)
- OR 12–18 hours in the refrigerator for deeper flavor
The dough will slightly expand and puff up but will not double in size—this is expected for gluten-free sourdough.
6. Scoring & Baking
- Carefully flip the dough onto parchment paper
- Score the surface with a sharp blade to control expansion
- Transfer into a cold Dutch oven and cover
Place into the oven and set temperature to 230°C (450°F)
- Bake 40 minutes covered (steam helps rise)
- Remove lid, reduce heat to 175°C (350°F)
- Bake an additional 30 minutes until golden brown
7. Cooling
Remove the bread and place it on a cooling rack. Allow it to cool completely before slicing to avoid a gummy texture. Proper airflow ensures the crumb sets correctly.
Storage & Freezing
- Store at room temperature for up to 3–4 days
- For longer storage, slice and freeze (up to 3 months)
- Reheat slices in a toaster or microwave
Expert Tips for Perfect Results
- Always use an active, recently fed starter
- Proof overnight for a more pronounced sour flavor
- Score deeper for better oven spring
- Use foil or a double base in the Dutch oven to prevent burning
- Do not skip psyllium or xanthan gum—they are essential
Troubleshooting Guide
- Dense crumb → Underproofing or incorrect flour ratio
- Gummy texture → Bread not fully baked or cooled
- Large air gap under crust → Overproofing
- Flat loaf → Weak starter or overhydration
Flavor Variations
- Cheddar Jalapeño: Add shredded cheese + chopped jalapeños
- Cinnamon Raisin: Add cinnamon, raisins, and brown sugar
- Chocolate Loaf: Add cocoa powder and chocolate chips
Nutrition (Approx. per 3 slices)
- Calories: 620 kcal
- Carbohydrates: 101g
- Protein: 13g
- Fat: 19.6g
- Fiber: 10.8g
